Master Key Help Topics
9. Multiple-users/Networks
There are quite a number of options setting up Master Key for multiple-users either on or off a network. To help keep the terminology clear and distinct, Pupils are the users in Master Key and Users are the accounts. It is not in the scope of this document to explain how to use servers. It is advisible that you have a fairly good understanding of how to manage your server. Below are instructions for the following options:
1. Centralized Pupils on
a no-account, one-account or all-admin privilege account
Mac
2. One Pupil per
User on or off network
3. Centralized
Pupils on individual Mac with
multiple-users
4. Centralized
Pupils on network shared folder
1. Centralized Pupils on a no-account, one-account or all-admin privilege account Mac
By default, Master Key uses this setup. This is fine if the Master Key folder is in a folder that has read/write privileges since the Pupil files that are in the Master Key folder will need write privileges so that they can be used and new pupil files can be created.
This works well for an individual OS X or OS 9 Mac where there is only one account used or in OS 9 if you do not use Multiple-Users or Macintosh Manager. It would also work if Multiple-users is on but the users are not restricted from write privileges for the folder in which Master Key resides. In Macintosh Manager, this works if it is not Panels or Restricted Finder but all the Pupils will reside on the local Mac.
2. One Pupil per User on or off network
This works well for both local and network accounts. The advantage is the administrator does not need to create any Pupils or at least the users would not have to create their pupil files. The disadvantage is that the administrator does not have control of the pupil files through Master Key.
Either in OS 9 or OS X, the Pupil will take on the name of the account. The pupil data is then saved in the file "Master Key History" in the User's preference folder. It is not possible to have more than one pupil per account nor is it possible to change the name of the Pupil.
This is made active by the Mac OS Account Mode preference in Master Key on the General tab. One way to make this work for all accounts is to have the Master Key Preferences applied to all User accounts that will use Master Key, either manually or by using Managed Preferences.
For OS X server/clients, preferences distribution can be done using the template in /System/Library/User Template. See Apple Documenation for more on this. If your account home folders are already created, you will need to use a tool such as File Blaster to distribute Master Key Preferences to the the account Preferences folder.
If you are using Macintosh Manager with preferences on the server, you can use Forced Preferences to deliver the Master Key Preferences.
Another to set all accounts to use Mac OS Account mode is to centralize one set of preferences using the instructions for option 3 if local or option 4 if network in addition to option 2. No Pupils folder is used locally or on the server if option 2 and 3 or 2 and 4 are used together.
3. Centralized Pupils on individual Mac with multiple-users
In an admin account, open Master Key and choose Create Network from the File menu and follow the directions for locating a folder that will be a read/write folder. In OS 9, use the System Folder:Application Support folder. In OS X, use the /Users/Shared folder. Make sure that that folder has read/write privileges for all users first.
4. Centralized Pupils on network shared folder
It is possible to keep an entire organization's Pupil files on one file server and have students use Master Key from any Mac that is on that network to access their Pupil files and Drills. In addition, all Macs on the same network may share the same preferences file so that all Macs may have their settings changed by only changing the settings on one Mac. By your choice you may allow users to change a subset of these preferences called User Options. This preference can be found on the Pupil Privleges tab in the Preferences.
Master Key will not run in a locked folder, which is common in OS X where the Applications folder is read-only for non-admin clients or in many of the Mac Manager environments where Restricted Finder or Panels is used, until it is configured to run on the network. To create the network setup automatically, you will want to find a place to run Master Key where it is in an unlocked folder first. Once it is configured, you may move the Master Key folder back to a locked folder, usually the Applications folder.
On an OS X Client, choose a folder or volume that has read/write access. Also for OS X, it is important that 10.2.3 or higher be used because of the addition of privileges inheriting from their parent folder. Standard Unix privileges will not work well with a Master Key folder in most cases. Open Workgroup Manager, select Share and the volume and make sure the option is set for privileges to be inherited from parents instead of the standard unix behavior.
This setup allows for centralized management of Drills and Preferences.
Setting up the OS X Server (10.2 and higher) for Managed X Clients
Open Workgroup Manager. Find or create a sharepoint such as 'Groups'. On the Protocols tab, set permissions to Inherit permissions from parent. Automount does not need to be on.
For Accounts-->Groups-->Group Folder, set the Network button and put in the server address and owner name. (I use admin). The folder will be your managed group name inside the Groups sharepoint.
For Preferences-->Groups-->Login Items: Select Add group share point.
Restart the client and login and the Groups volume should have mounted ready to go. It will show on the desktop depending on your managed Finder preferences.
Logout on the client and login as a local admin. Mount the groups volume as one of your users so that it appears as 'Groups' on the desktop. From here you can run Master Key intact as it was downloaded.
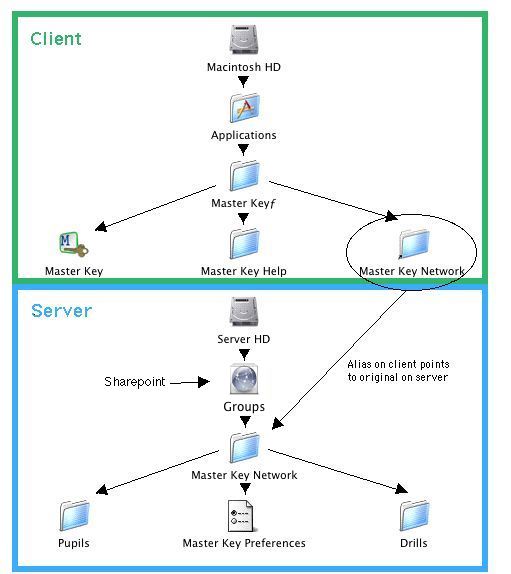
A Graphical Example of the Network Setup
Automatically
Note: For OS X, this method will not work if the network folder is created on a different volume with the same name. Use the manual method below in this case.
Mount the volume the volume for storing the Master Key Network folder the same way the clients will mount the volume with the same privileges.
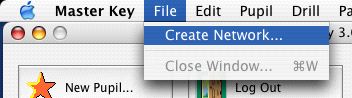
Select the "Create Network…" menu item in the File menu.
Select Create Network folder from the file menu, locate and select the Groups volume or another volume on the server. On an Macintosh Manager Mac, choose and shared volume or folder that has read/write privileges. Follow the on-screen directions that follow for this menu item.
Once done, logout and log back in as your network user. Now when Master Key is launched you will be using the network folder on the network. You can now go into the Master Key Preferences and select to hide the Master Key Network Folder for added security.
Manually
Mount the volume the volume for storing the Master Key Network folder the same way the clients will mount the volume with the same privileges.
Create a new folder on the server volume and name it "Master Key Network".

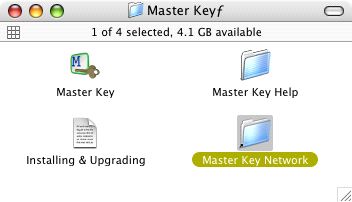
Set the privileges so that the user can read and write to the folder. Make an alias of the "Master Key Network" folder and copy it to all of the lab Macs "Master Keyƒ" folders. You may begin dragging and then hold command-option before dropping to create aliases without disturbing their names. Make sure the name of the aliases is "Master Key Network" and not "Master Key Network alias".
Copy the "Pupils" and/or "Drills" folder(s) that you would like shared, into the "Master Key Network" folder on the server. Whichever you do not copy will be created by Master Key when it is launched. The "Master Key Preferences" file will be created by Master Key when it is launched.

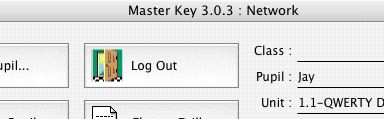
To test if a Lab Mac is using the "Master Key Network" folder on the server, launch Master Key and look in the title bar of the test window. If it says "Network" after the title and version, it is working. Otherwise, Master Key is using the preferences on the Mac is was launched on and is not sharing the central preferences.
If the preferences file is newly created, you will need to enter your registration code and name by launching Master Key on any lab Mac, selecting "About Master Key…" from under the Apple menu, clicking the "Enter Registration Code…" button, and entering the registration information given to you.
Once done, you will have an alias "Master Key Network", "Master Key" and "Master Key Help" It is the Master Key folder that contains these items that you will then want to distribute to all the client Macs. You can do this using Network Assistant, Remote Desktop, Golden Retriever or NetInstall on OS X.
Notes About Use
With Macintosh Manager 1.3 or earlier on OS 9 Macs, it may be necessary to install the Security Bypass Extension. This extension is incorporated into Macintosh Manager 1.4 and higher. It can be found here:
http://asu.info.apple.com/swupdates.nsf/artnum/n11633
If the server volume is not mounted, Master Key will ask to mount the volume. If the volume cannot be mounted, either becasue the access privileges are not correct or the server cannot be found on the network, Master Key will report the error and use files on the local Mac instead.
Pupil files are not locked as in-use. This means that a user can load the same Pupil file on more than one machine at once. The last one to unload the Pupil file records the Pupil file data. The best solution for this is to enforce the Pupil passwords.
Because none of the files can be in read-only directories, a bad person can trash everything. One method to prevent this is to turn on Hide "Master Key Network" folder.
It is also possible to centralize some files and not others. For instance you can choose to allow all the Macs to store their own preferences and not use the shared preferences by making aliases of the "Pupils" and "Drills" folders to inside the Master Key folder instead of using the "Master Key Network" folder.